In this sport, Brazilian Jiu-Jitsu (BJJ), we focus on control and submission through techniques. Here is a list of the 5 most well-known techniques in Jiu-Jitsu, in which we explain how to perform each one, the opponent's perspective, tips and the most common mistakes:

Closed Guard:
- How to run it?
You start below your opponent, placing your legs around his torso, crossing your feet behind his back to lock the guard. It is important to press your knees tightly against his sides, creating constant pressure to limit his movements. At the same time, use your hands to control him, preventing him from establishing a strong stance. Keep your hips slightly raised off the ground, which will allow you to move them more easily to adjust the guard or execute techniques.
Now work on breaking your opponent's stance. Use your legs to pull his body towards you while pulling his head or arms down, which will destabilize him and give you control. Continue to squeeze with your legs and pull his arm to the side, unbalancing him if your opponent tries to lift his stance. Stay active, constantly looking to adjust your position and create angles to attack with submissions or set up sweeps.
- Perspective from the opponent:
Your next goal is to open your opponent's closed guard in order to advance into a more favorable position. A common technique is to gently push down on your opponent's hips while leaning back to apply pressure and force their legs open. You can also try to control one of their wrists with one hand while the other pushes against their knee, creating a space to slide your leg through and begin to pass their guard. Stay focused and don't rush, as any mistake can lead to a quick counterattack from below.
- Tips:
- Strong legs: Essential for maintaining closed guard effectively, especially when trying to control an opponent stronger than you.
- Don't stay static. You must constantly be looking for opportunities to break your opponent's posture, attack with submissions or sweeps.
- Learn to transition from closed guard to other guard positions and submission techniques. This will make you more unpredictable and dangerous to your opponent.
- Errors:
- Don't relax your legs around your opponent. This will give him the opportunity to break your guard and move into a dominant position.
- If your opponent manages to sit up or raise his torso, your control is greatly diminished. You must constantly work to keep his posture low.
- Not controlling your opponent's hands can allow him to start breaking your guard or setting up his own attacks.
Kills Lion:
- How to run it?
Position yourself behind your opponent's back, wrap one arm around his neck, placing the inside of your elbow just below his chin. With the same arm, bring your hand to the opposite side of his neck, making sure that your arm is pressed tightly against his throat. Then, with your free hand, grab the wrist of the arm around his neck, forming a sort of closed "V." This is the crucial first step in blocking blood flow to the brain, which triggers the submission.
Place your free hand behind your opponent's head to maintain control and prevent him from escaping, bring your elbows together and squeeze your arms in towards your body, applying even pressure to the sides of your opponent's neck. It is important to not only squeeze with your arms, but also use your chest and shoulders to increase the pressure, creating a more effective choke. While applying the choke, make sure to keep your legs hooked around your opponent's waist to prevent him from turning or escaping. If the technique is performed correctly, your opponent will be forced to submit or lose consciousness within a few seconds.
- Opponent's perspective:
Be proactive. As soon as you feel your opponent's arm around your neck, your first goal is to prevent the technique from being completed. One of the most common reactions is to bring your hands to the arm that is around your neck, trying to relieve the pressure and prevent the choke from deepening. You can try to grab the wrist of the arm that is strangling you and pull it down, creating space between his arm and your neck. Another option is to grab the hand that is trying to secure your head and prevent the "V" that would complete the technique from closing.
If the position is already well advanced and the Lion Kill is almost complete, you need to act quickly. Try to turn your chin towards the arm that is strangling you to partially protect your neck and make it easier to breathe. You can also try to turn your body towards the side of the arm that is strangling you, with the aim of getting rid of its control of your back or at least relieving the pressure. If your attempts to escape do not work and you feel like your air and blood are being cut off, the best option is to surrender to avoid losing consciousness and to minimize the risk of serious injury.
- Make sure your arm is around your opponent's neck and is tight, with your elbow directly under the chin.
- Use your other hand to push the opponent's head down to make the choke more effective.
- Keep your chest pressed against your opponent's back to prevent him from escaping.
- Errors:
- Not adjusting the arm properly, allowing the opponent to breathe.
- Do not lock the opponent's head, allowing him to defend himself or escape.
- Lack of pressure on the opponent's body, giving him room to move.
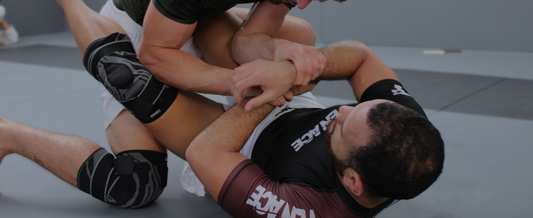
Kimura :
Tenace (@tenacesports) • Instagram photos and videos
- How to run it?
You can start from closed guard, half guard, or from the top in side control position. Once you are in a suitable position, take control of the wrist of your opponent's arm with one of your hands, making sure that your thumb is facing down and your grip is firm. Then, reach your other arm over his arm, so that the elbow of that arm is bent around your opponent's elbow. With this hand, grab your own wrist, forming an "L" or "T"-like shape with your arms, which gives you strong leverage to apply the technique.
Bring your opponent's arm behind his back, lifting his elbow and rotating the shoulder joint. This move creates strong pressure on your opponent's shoulder and elbow, driving them to a point of pain that will force a submission. As you apply leverage, make sure you maintain control over his body so he can't twist or escape. If you're in guard, use your legs to control his posture and prevent him from breaking free. If you're in a top position, use your weight to immobilize his torso. As you increase the pressure, do so gradually to give your opponent a chance to submit before injury occurs.
- From the opponent's perspective:
If you're already in the advanced stage of Kimura and your arm is trapped, your focus should be on relieving the pressure and looking for a way out. If you're on top, you can try to roll your body toward the trapped arm to reduce the torque on your shoulder. You can also try to roll forward or to the opposite side to free the arm and get out of the position. If you're on the bottom, the situation is more complicated; try to turn your body toward the direction your arm is being pulled to undo the leverage, or use your legs to create space and force an escape. If the pressure intensifies and you can't escape, it's crucial to recognize when to give up to avoid serious shoulder or elbow injury.
- Tips :
- Control your opponent's wrist with one hand while your other hand passes over his arm to secure the grip.
- Use your hips and body to apply pressure to your opponent's shoulder.
- Keep your opponent's arm bent at a 90-degree angle to maximize leverage.
- Errors:
- Failing to properly secure the opponent's wrist, allowing him to escape.
- Using only arm strength instead of involving the entire body to apply leverage.
- Allowing the opponent to straighten his arm, decreasing the effectiveness of the technique.
Armlock:
Tenace (@tenacesports) • Instagram photos and videos
- How to run it?
To perform an armlock (also known as an armbar), start in a controlling position, such as mount or closed guard. If you're in guard, first control your opponent's arm by grabbing his wrist with one hand and his elbow with the other. Then, place one of your feet on his hip to gain leverage and rotate your body perpendicular to his, bringing your opposite leg over his head. As you do this, pull his arm toward you, keeping his elbow tucked in to your chest. It's crucial to maintain a firm hold on his arm so he can't slip away during the transition.
Once you're in position, cross your legs to ensure that their head and torso are controlled. Then, with their arm still trapped, begin to extend your body backwards while keeping your opponent's arm tight against your chest. This move applies pressure to the elbow joint, forcing it to hyperextend. To increase effectiveness, make sure your opponent's thumb is pointing up and their elbows are aligned properly. The key is to apply pressure in a controlled manner, allowing your opponent to give up before the elbow sustains injury.
- From the opponent's perspective:
If the armlock is more advanced and you feel your arm being extended, you must act quickly to avoid hyperextension. One technique is to try to turn your thumb towards your opponent and align your arm with their body, which reduces the pressure on your elbow. At the same time, try to move closer to your opponent to decrease the space between you, making it harder for them to fully extend your arm. You can also try to roll or twist towards the direction your arm is being pulled to reduce the tension. If you cannot escape and feel the pressure is too intense, the safest thing to do is to give up to protect your arm from possible injury.
- Tips :
- Keep your knees together around your opponent's arm for stronger control.
- Make sure your opponent's thumb is pointing up to maximize pressure on the elbow.
- Use your hips to lift and apply leverage, not just your arms.
- Errors:
- Not keeping your knees together, allowing your opponent to pull his arm out.
- Allow the opponent to rotate the wrist, reducing the pressure on the elbow.
- Try to pull with your arms instead of using your hip power to apply leverage.
Triangle:
- How to run it?
Once you've established the triangle position, adjust the angle by turning your body slightly so that you're facing directly towards the trapped arm's ear. Make sure the knee of the leg that's on their neck is aligned downwards, as you pull their head towards you to tighten the triangle. Cross your feet and use your hips to raise yourself up slightly, squeezing your legs together to increase the pressure on their neck. Maintain control over their head and arm as you close the triangle, which should quickly lead to your opponent giving up due to lack of blood circulation to the brain.
- From the opponent's perspective:
If the Triangle is almost closed and your arm is already trapped, you need to act quickly to escape. You can try to push your opponent's hip down to create space and relieve pressure on your neck. Another strategy is to try to stand up, driving your opponent's knee toward the ground to change the angle and reduce the effectiveness of the choke. Simultaneously, use your free hand to push the leg that is on your neck, trying to force an opening. If you feel that the choke is too tight and you cannot escape, it is crucial to recognize the need to submit to avoid losing consciousness.
- Tips :
- Make sure your leg is over your opponent's shoulder and snug around his neck.
- Control the opponent's arm inside the triangle to prevent him from defending.
- Squeeze your knees together and use your hips to apply pressure to your opponent's neck.
- Errors:
- Not adjusting the leg properly, allowing the opponent to breathe or escape.
- Not controlling the opponent's arm, allowing him to lock in the choke.
- Do not use your hips to increase pressure, making the choke less effective.

At @tenacesports you will find more technique tutorials.